What "Gentle" Really Means (When It Comes to Core Work)
Most beginner core workouts are written by people who have not been beginners in years. They say "beginner" but still assume you can hold a plank for 60 seconds, breathe normally, and never feel a twinge in your lower back. This article is not that.
When I first started teaching movement classes, my idea of "gentle" was still too intense. I would put participants on the mat, crank up the tempo, and watch them gasp through dead bugs. It worked - until it didn't. The turning point came when a client named Sarah walked into my studio. She was eight months postpartum, dealing with a 3-centimeter diastasis recti gap, and every "beginner" core video she tried left her in more pain than when she started. The problem was not her effort. The problem was the framework.
"Gentle" core work does not mean "slightly less intense" core work. It means something fundamentally different: training that respects your nervous system, your breath, and the deep stabilizers that most workouts ignore. This guide gives you a complete, breath-first approach to core strength. No crunches. No planks (at least, not yet). Just a clear progression that starts with your breath and builds from there.
Why Your First Core Exercise Is a Breath (Not a Crunch)
Here is a question that surprises most of my new clients: What is the one exercise you can do every single day, without equipment, that strengthens your core more effectively than a sit-up ever could? The answer is not a plank. It is not a dead bug. It is a simple, full exhale.
Your diaphragm is a dome-shaped muscle at the base of your ribcage. When you inhale, it flattens and descends, pushing your abdominal contents down and forward. When you exhale, it relaxes and rises back up. This rhythmic movement is the foundation of your core - but most people never learn to feel it.
The thing nobody tells you about core strength is that your abdominal wall is designed to work like a hydraulic system. When you breathe in, your belly expands and your pelvic floor lengthens. When you breathe out, your deep abdominal muscles (the transversus abdominis) contract, your pelvic floor lifts, and your spine stabilizes. If you are holding your breath or breathing shallowly, you are missing the entire point.
How to Perform Diaphragmatic Breathing
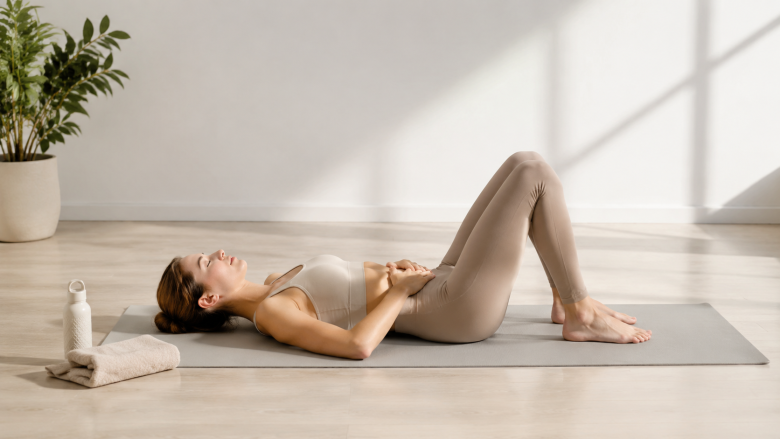
Lie on your back with your knees bent and feet flat on the floor. Place one hand on your belly and one on your chest. Inhale slowly through your nose, imagining that you are filling a balloon in your lower belly. You should feel your belly rise, not your chest. Exhale gently through pursed lips, feeling your navel draw toward your spine. Your lower back should press lightly into the floor. Repeat for 10 slow breaths.
That is your first gentle core exercise. It is also the foundation for every other movement in this article. If you cannot breathe calmly and evenly while doing an exercise, you are not ready for that exercise yet. This is not a metaphor. It is a test you can apply to any movement.
The RPE Scale: Effort You Can Feel, Not Measure
Most workout programs tell you to do a certain number of reps and sets. They might even give you a tempo. But very few tell you how hard to try. This is where the Rate of Perceived Exertion (RPE) scale comes in.
RPE is a subjective measure of how hard you feel you are working. It is typically rated on a scale of 1 to 10, where 1 is sitting on the couch and 10 is sprinting away from a bear. For gentle core work, you want to stay in the 3 to 4 range - a level where you feel a light engagement in your abs but can still hold a conversation without gasping.
Here is the key insight: if you are doing a bird dog and you have to hold your breath to complete the rep, or you feel your lower back arching, or you feel a sharp pulling sensation in your abdomen, your RPE is too high. Back off. Reduce the range of motion or take a break. The point is not to push through discomfort; it is to build awareness of what your body is telling you.
Most people do not realize that the feeling of "working hard" is often a sign of compensation. Your body is smart. If your deep stabilizers are not engaging, your superficial muscles (and your ego) will take over. That is how you end up with a sore neck from crunches and a lower back that still hurts. RPE gives you permission to slow down.
Before You Start: The Breath-First Checklist
Before you attempt any of the exercises below, run through this quick checklist. It will take less than 60 seconds and it will dramatically improve the quality of every movement that follows.
- Belly check: Place one hand on your lower belly. Take a normal breath in. As you exhale, imagine you are blowing up a balloon in your belly. You should feel your abdomen gently pressing into your hand.
- Rib check: Place your hands on your lower ribs. As you exhale, feel your ribs draw down and together. This is the position your core should be in during every exercise.
- Spine check: Gently tuck your chin toward your chest and round your shoulders forward. This is called a posterior pelvic tilt. Now slowly roll your shoulders back and lift your chest. This is a neutral spine. You want to maintain a slight natural curve in your lower back - not a flat board, not a swayback.
The Breath-First Core Blueprint: 8 Gentle Core Exercises
Here is where the real work begins. I have divided the exercises into three levels. Start with Level 1 and only move on when you can do the movements without holding your breath or feeling pain.
Level 1: Foundation Drills
1. Diaphragmatic Breathing (Lying Down)
We covered this above, but let me add one detail: place a small cushion or folded towel under your head if your neck feels strained. Perform 10 slow breaths, focusing on the exhale lasting twice as long as the inhale. This is not just a warm-up. This is the exercise.
2. Pelvic Tilts
Lie on your back with your knees bent and feet flat on the floor. Inhale to prepare. As you exhale, gently tilt your pelvis toward your heels, pressing your lower back into the floor. You should feel your deep abdominal muscles engage, not your glutes or lower back. Inhale to release. That is one rep. Aim for 10 to 12 slow reps.
What can go wrong: if you feel your lower back arching off the floor or your neck tensing up, you are using too much effort. The movement is small - only about 2 to 3 inches of tilt.
Level 2: Building Stability
3. Glute Bridges
Start on your back with your knees bent and feet flat on the floor, hip-width apart. Place your arms by your sides with your palms facing up (this prevents you from pushing with your hands). Exhale as you press through your heels and lift your hips toward the ceiling. Squeeze your glutes at the top, but do not arch your back. Inhale as you slowly lower back down. That is one rep. Perform 8 to 10 reps.
The breath test: if you cannot maintain a steady, even breath throughout this movement, reduce your range of motion. You can also try a hip lift with just a few inches of movement.
4. Bird Dogs
Start on your hands and knees with your wrists under your shoulders and your knees under your hips. Keep your spine neutral - imagine a glass of water balancing on your lower back. Exhale as you extend your right arm forward and your left leg back, reaching through your heel. Keep your hips level. Do not let your pelvis open toward the ceiling. Inhale as you return to the starting position. That is one rep. Do 8 per side.
This is a breath test, not a rep test. If you find yourself holding your breath or your lower back starts to ache, shorten the leverage. Instead of straightening your leg fully, keep your toe on the floor and just reach your hand forward.
5. Dead Bugs (Regressed)
Lie on your back with your knees bent and feet flat on the floor. Extend your arms toward the ceiling with your palms facing each other. Exhale as you slowly lower your right arm overhead and straighten your left leg toward the floor. Keep your lower back in a neutral position - if it starts to arch, stop and bring your leg back up. Inhale as you return to the starting position. Do 8 to 10 reps per side.
For many beginners, even this regression is too much. If your lower back lifts off the floor, place a rolled-up towel under your lower back and think about pressing down on it with every rep.
Level 3: Integration
6. Tabletop Toe Taps
Lie on your back with your legs in a tabletop position (knees over hips, shins parallel to the floor). Place your hands on your hip bones. Exhale as you slowly lower your right foot toward the floor, keeping your knee bent at 90 degrees. Your foot does not need to touch the ground - just lower it until you feel your lower back start to work. Inhale as you raise it back up. Do 10 per side.
The key is to keep your belly drawing in toward your spine as if you are wearing a corset. Do not let your belly dome upward.
7. Kneeling Side Plank (Knees Down)
Lie on your left side with your left elbow under your shoulder and your left knee on the floor. Extend your right leg straight, with your right foot flat on the floor in front of your left knee for support. Place your right hand on your right hip. Exhale as you lift your hips, forming a straight line from head to knees. Inhale as you lower back down. Do 6 to 8 reps per side.
If this hurts your shoulder, keep your bottom arm slightly bent or place a cushion under your elbow. You can also do this exercise with your knees bent and your feet lifted off the floor for extra stability.
8. Standing Core Bracing
Stand with your feet hip-width apart, knees soft, and hands on your hips. Exhale as you gently draw your navel toward your spine, as if you are preparing to take a playful punch. Do not hold your breath. You should feel a deep, muscular contraction across your entire abdominal wall. Hold for 10 seconds while breathing normally. Release and repeat 5 times.
This is a fantastic exercise for beginners because you can do it anywhere - at your desk, in line at the grocery store, or while waiting for your coffee to brew. It teaches you how to engage your core without anyone knowing you are doing it.
The 2-Week Plan: Progress by Breath, Not Reps
So what does the best core workout for beginners actually look like? It is not a single 20-minute session. It is a consistent, twice-daily practice of the exercises above, with a few ground rules.
Week 1: Master the Exhale
Days 1 through 7: Perform the following routine every other day (3 to 4 times total). Do not add resistance. Do not add reps. Focus entirely on maintaining a calm, even breath throughout each movement.
- Diaphragmatic breathing: 10 breaths
- Pelvic tilts: 10 reps
- Glute bridges: 8 reps
- Bird dogs: 8 reps per side
That is it. The entire session should take 7 to 10 minutes. If you finish and feel bored, good. Boredom means you are not in pain, which is the goal. Boredom also means you can progress.
Week 2: Add Movement
Days 8 through 14: Add dead bugs and tabletop toe taps to the routine. Continue with the same breathing focus. If at any point you feel like you cannot take a full, complete breath, stop and rest.
By the end of two weeks, you should be able to perform the entire sequence without holding your breath, feeling pain, or feeling like you need to nap for an hour afterward. That is the real definition of success. Not a six-pack. Not a number on a scale. Just the ability to move with awareness and control.
The "Big 3" Core Exercises (And Why They Are Not What You Think)
You have probably heard of the "big 3" core exercises. In the fitness world, this usually refers to McGill's Big 3: the side plank, the bird dog, and the modified curl-up. These are often prescribed for people with lower back pain because they train the core to stabilize the spine without excessive flexion or extension.
Here is the thing, though: for absolute beginners, even the big 3 can be too advanced. Side planks require significant shoulder and hip strength. The bird dog requires hip mobility and balance. The curl-up requires you to repeatedly flex your spine, which is exactly what you are trying to avoid if you have disc issues.
So let me redefine the "big 3" for you. These are the three foundational skills you need before any other core work makes sense:
- Diaphragmatic breathing - the ability to breathe into your belly without flexing your neck.
- Pelvic tilts - the ability to articulate your pelvis without using your lower back.
- Standing core bracing - the ability to engage your core while standing upright, under no load.
Master these three, and every other core exercise becomes easier and safer. Skip them, and you are just guessing.
How to Tone Your Stomach (Without the Guilt Trip)
"Toning" is one of the most misunderstood words in fitness. Physiologically, there is no such thing as a "toned" muscle. There is only muscle mass and body fat. What people usually mean when they say "tone my stomach" is: they want their abdominal muscles to be visible and their core to feel strong.
Here is the honest truth: you cannot spot-reduce fat. Doing 1,000 crunches a day will not burn belly fat any faster than doing none. What does work is consistent, full-body strength training, a balanced diet, and - this is the part most people skip - fixing your posture.
Your core is not just your six-pack muscles. It is a 360-degree system that includes your pelvic floor, your diaphragm, your deep back muscles, and your obliques. When you stand up straight, your core has to work harder than when you slouch. When you breathe deeply and fully, your core has to work harder. That is what the breath-first approach is all about.
If you are looking for a more structured way to track your progress, I like using the Qigong calories calculator to estimate the metabolic cost of a mindful movement session - it is a gentle reminder that even slow, deliberate practice burns more than sitting on the couch.
When to Pause: Red Flags and Modifications
Even with the most gentle approach, things can go wrong. Here are the red flags that mean you should stop and check in with a professional.
- Sharp, stabbing pain: This is different from muscle soreness. If it hurts to breathe, stop.
- Numbness or tingling: This could be a sign of nerve compression, especially if it runs down your leg or into your arms.
- Dizziness or lightheadedness: This can happen if you are holding your breath or if your blood pressure is dropping.
- Increased pain after exercise: It is normal to feel a little tired. It is not normal to feel like you have been hit by a truck.
Post-Natal Considerations
If you are postpartum, your core is different from a man's core or a woman who has never given birth. The linea alba (the connective tissue running down the middle of your abs) can take months or years to regain its tension. The gentle exercises in this article are a great starting point, but you should always work with a women's health physical therapist first. They can assess your specific needs and give you the green light on when to progress.
Elderly and Deconditioned Individuals
If you are over 65 or have been sedentary for a long time, start with the breathing exercise and pelvic tilts only. Do them twice a day for a full week before adding glute bridges. Your nervous system needs time to adapt. There is no rush.
The Bottom Line
Gentle core exercises for beginners are not about doing less. They are about doing what matters most. The breath-first approach is not a shortcut or a gimmick. It is a recognition that your core is the center of your body, and it deserves the same respect you would give any other important relationship: slow, steady, and consistent attention.
Try the two-week plan. Not because I wrote it, but because you deserve to know what it feels like to move without pain. And when you are ready for the next step, come back and do it again. The breath never lies.