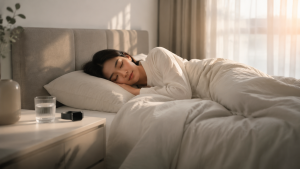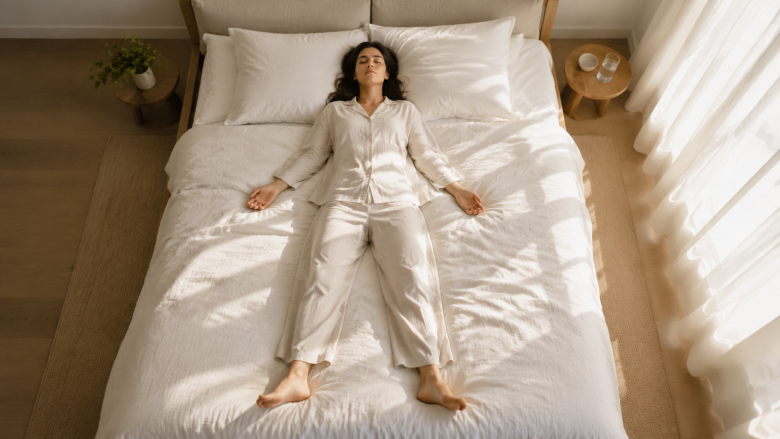
If you're looking for the best relaxation position for sleep, here's the short answer: supported side-lying with bent knees and a protected front, or a properly supported corpse pose on your back with a pillow under your knees. But the position itself is only half the story. The real magic happens when you use your body's position to signal your nervous system that it is safe to let go.
Most sleep position advice treats your body like a mechanical alignment problem. This article treats it like a nervous system problem, because that's what it actually is. I've spent years testing positions with clients who can't fall asleep not because of pain, but because their bodies stay on guard all night. What follows is the framework I use with them, starting with the positions and ending with the pillow placement details that most guides ignore.
Why Most Sleep Position Advice Misses the Relaxation Problem
Search for "best sleep position" and you'll get a wall of clinical advice: side-sleeping for sleep apnea, back-sleeping for acid reflux, warnings about the fetal position for morning neck pain. All of this is useful. None of it tells you how to relax.
The gap is the felt experience. Healthcare professionals focus on what your spine looks like from the outside. But your nervous system doesn't see your spine. It feels the pressure of the mattress against your side, the openness of your throat, the height of your knees, and whether your arms are tucked in a protective curl.
When I first started working with people on sleep posture, I noticed something curious. Clients who could describe the textbook ideal position - the one their physical therapist showed them - still couldn't fall asleep. They were lying in a biomechanically correct position that felt unsafe and exposed.
Most people don't realize that the position you assume in the first five minutes of bed is almost never the position you wake up in. Your body moves at night to preserve comfort. So the question isn't what position you end up in. It's what position you start in, and whether that starting position gives your nervous system a clear "all clear" signal.
The Nervous-System Downshift Framework
Before we get into specific positions, I want to give you a framework for evaluating any sleep position. I've developed this over many nights of testing and observation with clients. Call it the three-signal check. A good relaxation position nails all three signals:
- Signal 1: Protected front. Your torso feels covered or supported in a way that reduces your need to guard. This is why side-lying with arms tucked or a pillow hugged against your chest feels calming. It's a mammalian self-protective posture.
- Signal 2: Open airway. Your neck is neither too flexed nor too extended. The angle of your head should let you breathe through your nose without effort. Labored breathing is a direct trigger for the stress response, and it will override any positional benefit.
- Signal 3: Joint release. Your knees, hips, and shoulders are supported in a bent position that lets the muscles around them stop firing. Straight-legged positions keep hamstring and hip flexor tension active, which elevates baseline arousal.
If a position fails any of these three signals, it will not produce deep relaxation regardless of how healthy it is for your spine. This framework doesn't replace medical advice for back pain. If you have a herniated disc or chronic pain, follow your clinician's guidance. This is about the relaxation layer - what makes your body feel safe enough to sleep.
The Top Relaxation Positions
Here are the positions I recommend, ranked by how consistently they produce a nervous-system downshift in the people I've worked with. I've included setup instructions and the common mistakes to avoid.
1. Supported Side-Lying (The Lateral Release)
This is the gold standard for relaxation-based sleep for most people. It combines the clinical benefits of side-sleeping with the psychological comfort of a protected front.
Here's how to set it up:
Lie on your non-dominant side - most people naturally prefer the side opposite their writing hand. Bend both knees to about 100 degrees. Your bottom arm extends straight forward, palm down, in a relaxed "reaching" position. Your top arm rests on top of your bottom arm, or you can wrap it around a body pillow.
The key detail almost everyone gets wrong: your bottom leg should be slightly more extended than your top leg. When your bottom leg is bent too deeply, it rotates your pelvis forward and strains your lower back. The top knee should sit slightly ahead of the bottom knee, not directly stacked. This opens the hip joint and lets your pelvic floor release.
When I first tried this position, I made the mistake of keeping my knees perfectly stacked like a textbook diagram. My top hip complained within 20 minutes. It turns out the "stacked knees" advice is designed for spinal alignment, not relaxation. Slight offset is what actually releases tension.
For your head, use a pillow that fills the gap between your head and your shoulder without tilting your nose up or down. Your neck should feel like your head is resting in a cradle, not a chin-up position.
2. Supported Corpse Pose (Reclined Savasana)
If side-lying makes you feel claustrophobic - and it does for a subset of people - the supported corpse pose is your relaxation position. It's how you fall asleep on your back without feeling exposed.
The setup is the opposite of what most people try. Do not lie flat on a thin mattress with a thin pillow. You need elevation and support at three specific contact points:
- Knees: Place a pillow or rolled blanket under your knees. This is non-negotiable. It relaxes your hip flexors, reduces the curve in your lower back, and sends a direct relaxation signal to your psoas muscle - the muscle most closely tied to the fight-or-flight response.
- Head: Use a pillow thicker than you think you need. A pillow that's too thin tilts your chin toward your chest and closes your airway. You want your chin slightly tucked but your throat open.
- Arms: Let them rest at your sides, palms up, slightly away from your body. Or cross them gently over your chest if that feels safer - but add a small pillow under the crossing point to avoid shoulder tension.
The palms-up position matters more than you'd think. Palms-down keeps subtle tension in your forearm muscles and rotator cuff. Palms-up signals to your brain that you've literally opened your hands to the night.
The thing nobody tells you about corpse pose: it feels terrible for the first three nights if you're not used to it. Your body will feel vulnerable and your mind will race. Stick with it for five nights before deciding it's not for you. The relaxation response is a skill, not a reflex.
3. The Pillow Nest
There's a category of position that doesn't get enough attention in sleep literature: the nest. This is when you deliberately surround yourself with pillows, blankets, or a weighted blanket so your body feels engulfed. It works for people who feel too exposed in any standard position.
To create a nest, lie in your preferred position - side or back - and wedge pillows into every gap where your body might feel unsupported. Along your back, between your knees, under your arm, at your lower back. The goal is for every square inch of your body to be in contact with something soft.
Why this works: your nervous system uses lateral pressure as a safety signal. Think about how a deep-pressure vest works. The nest replicates that on a smaller scale.
I worked with a client who could only fall asleep on a sofa, crammed into the corner with cushions all around. Her therapist called it a crutch. I told her to replicate the sofa's enveloping feeling in her bed. She bought two extra body pillows and stacked them along the wall side of her bed. Within a week, she was sleeping in her own bed for the first time in months.
The nest also fixes the "can't sleep when traveling" problem. You're not missing your mattress - you're missing your pillow environment.
4. The Weighted-Element Position
If you have a weighted blanket or a heavily stuffed duvet, your position can change based on where you distribute that weight.
The most underrated relaxed position: side-lying with the weighted blanket pulled up to your shoulders and tucked slightly under your chin, so it drapes over your top arm and your side like a heavy hand resting on you.
This is different from the standard "weighted blanket on top of you" advice. The key is the pressure gradient. You want the most weight on your torso and the least weight on your feet. Many people pull a weighted blanket up to their chin and trap their feet underneath, which creates a foot-ward pull that keeps the nervous system awake.
Instead, let your feet poke out or use a separate lightweight layer for your feet. Your torso bears the pressure while your feet stay free.
Comfort Mapping: Where to Put Pillows to Melt Muscle Tension
Let's get specific about pillow placement. This is the comfort mapping idea I mentioned earlier - a systematic way to place pillows to eliminate every point of muscle tension before you close your eyes.
Go through this checklist in order, adding pillows as needed:
- The neck gap: The space between your ear and your shoulder, when side-lying, should be completely filled. Test this: if you can slide your pinky between your ear and the pillow, your pillow is too thin.
- The knee gap: Between your knees when side-lying, or under your knees when back-lying. Without this, your hip joint sits in a slightly open, unstable position.
- The waist gap: For side-sleepers, the gap between your ribs and your hip often leaves a hollow space that lets your spine droop. Wedge a small cushion or a folded hand towel there.
- The arm gap: The arm you're not lying on should be supported, not drooping over the edge of the mattress.
- The lumbar gap: For back-sleepers, a small rolled towel or lumbar cushion in the curve of your lower back - not too thick, just enough to feel your back cradled.
When I started doing this systematically, I was shocked at how easy it was to fall asleep after just two minutes of pillow shifting. Most people skip this step because they want to believe one perfect pillow exists. It doesn't. You need a constellation of support points.
A practical tip: keep a pillow stack on the floor beside your bed and pull pillows out as you need them during the night. Forgetting to bring a spare pillow upstairs is one of the most common reasons people sleep badly.
The 90-Second Relaxation Scan
Here's a technique that takes less time than brushing your teeth. Once you're in your chosen position, do a 90-second full-body scan starting at your jaw:
- Jaw: Unclench. Make sure your teeth aren't touching.
- Shoulders: Let them drop away from your ears, even if you have to deliberately push them down.
- Hands: Open your palms. Finger curl is a tension tell.
- Feet: Let your toes point slightly outward instead of tensing toward the front of your shin.
- Forehead: Smooth the muscles between your eyebrows.
This scan is the missing link between lying in a position and actually relaxing. No position will work if you're holding yourself stiffly in it. I see this constantly - people who set up the perfect pillow arrangement and then fight it with their own muscles.
Comparison Table: Which Position Should You Try First?
| Position | Best For | Avoid If | Key Pillow Setup |
|---|---|---|---|
| Supported Side-Lying | Most people; snorers; those with acid reflux | Shoulder pain on the side you lie on | Pillow between knees, one under head, one hugged to chest |
| Supported Corpse Pose | Back sleepers; people who feel claustrophobic side-lying | Obstructive sleep apnea (unmanaged) | Pillow under knees, thicker pillow under head, palms up |
| Pillow Nest | People with anxiety; light sleepers; frequent travelers | People who overheat easily | Pillows along back, under arm, between knees |
| Weighted-Element Position | People who crave deep pressure | Anyone with respiratory issues at night | Weighted blanket on torso only, feet free |
If you're not sure where to start, begin with supported side-lying with knees bent at 100 degrees and a pillow between them. It has the highest success rate and the lowest failure mode. If that doesn't work within a week, try the supported corpse pose or the nest.
When Anxiety Makes Every Position Wrong
Let's address the experience that no competitor article covers: the nights when no position feels right because your mind is racing.
This is where the positioning-for-downshift concept becomes truly powerful. You can use your body's position as a tool to talk down the brain, rather than waiting for your brain to let your body relax.
If you find yourself tossing side to side, unable to settle, try this sequence:
- Lie on your back with your knees bent and feet flat. Put one hand on your belly, one on your chest.
- Take five slow breaths. In through your nose for four counts, hold for two, out through your mouth for six counts. You want the exhale longer than the inhale - this directly activates your parasympathetic nervous system.
- After those five breaths, roll onto your preferred side and arrange your pillows. The key is to make the transition without losing the breath rhythm. Let the side position take over from the breath exercise.
What you're doing here is using the relaxation position as an anchor for the relaxed state you've just induced. Most people try to just lie down and hope relaxation happens. But you can manufacture it with a breath-based transition.
For persistent night-time anxiety, the position itself matters less than your relationship with the process. Set up your environment for an evening wind-down first. As we covered in our guide on planning weekly evenings for relaxation, the 60 minutes before bed do more for your sleep position's effectiveness than any pillow you can buy.
Another approach for anxiety-heavy nights: the "long exhale position." Lie on your side with both knees bent and your top hand on your belly. Each time you exhale, let your belly sink a little deeper into your bottom hand. This combination - position plus tactile feedback plus breath - creates a feedback loop that accelerates the nervous system downshift far more than any single factor alone.
If you wake at 3 AM with your mind running - one of the most common sleep complaints I hear - the instinct is to check the clock and adjust your position. Don't. Keep your eyes closed, remind yourself that you're in a safe position, and instead of getting up, readjust one single pillow. Just one. Give your hands something to do that is restful.
What Not to Do (and What I've Learned the Hard Way)
I want to be honest about the limitations of all this advice. When I first started experimenting with relaxation positions, I made some mistakes.
The over-bent neck mistake. I once spent two weeks sleeping in the perfect fetal position with knees stacked and a body pillow, only to discover I'd been over-bending my neck at the top. My neck felt fine in the moment, but I woke up with a headache every morning. The fix was elevating my head pillow half an inch.
The flat-back overcorrection. I also overcorrected for lower back pain by sleeping flat on my back with a pillow under my knees for two months. When I finally returned to side-sleeping, my hip flexors had shortened so much from the flat-back position that I ached for a week. Balance is everything - any single position held too rigidly will cause its own problems.
The "crutch" argument. Some sleep experts will tell you that using a body pillow or a nest is a crutch. In my experience, that's nonsense. The body doesn't know the difference between a crutch and a tool. If it produces relaxation, it works.
One limitation nobody wants to talk about: position changes alone will not fix insomnia rooted in unprocessed stress or medication side effects. If your racing mind persists after two weeks of intentional positioning work, talk to a physician or a sleep specialist. Your position is part of the solution, not the whole solution.
Building a Relaxation-First Sleep Routine
The final piece: position works best when it's integrated into a wind-down routine. You could adopt every position I've described and still sleep badly if you're going from a frantic laptop session straight into a relaxation position.
Here's what I recommend based on my own experience and the experiences of the people I've worked with:
- Set a "last check" time for your phone 30 minutes before your intended sleep time. Do not bring it into bed.
- Do your 90-second relaxation scan as you get into your chosen position - or do it as a quick pre-bed ritual before you close your eyes.
- If you're a "night brain" person, write down your worries and your tomorrow to-do list before you get in bed. The act of writing both clears your mental load and signals to your brain that future worries have been handled.
Knowing your sleep need helps you time this correctly. If you're constantly underestimating how many hours you need, all the position work in the world won't fix a chronic sleep deficit. A sleep need calculator can give you a personalized target so you're not guessing whether 7 hours or 9 hours is right for you.
And for tracking whether your relaxation routine is actually producing deeper rest, keeping a simple sleep log can show you patterns you'd never catch otherwise. Notice whether you wake up less during the night after a week of consistent positioning practice - that's progress even if the total hours stay the same.
The beauty of this approach is that you don't need to buy anything expensive. You need a few pillows, maybe a rolled towel, and the willingness to spend two minutes adjusting before you fall asleep.
The Bottom Line
The best relaxation position for sleep is the one that makes your body feel safe, supported, and free of tension. For most people, that's supported side-lying with bent knees, a protected front, and pillows in all the right gaps. For others, it's a properly supported corpse pose with a pillow under the knees and palms up. And for a third group, it's a pillow nest that envelops the body in deep pressure.
Start with the three-signal check: protected front, open airway, joint release. Then go through the comfort mapping checklist and place pillows to fill every gap. Then do your 90-second scan and release your jaw, shoulders, and hands.
The position is a tool, not a rule. Test different variations. Keep what works, drop what doesn't. And if you're already doing everything right but still can't relax, involve a doctor. Your sleep is worth the effort.
Sleep well.